I have learnt more than going through this project than any other. I have had a lot of problems with the group project and then in the end, decided it would be better to focus on my own work than try to piece together something that I would not be happy with.
Part of that learning curve was to always have a contingency plan as if things do not work out, like I found, they are there to fall back on. I also leant not to be afraid to call people up on not pulling their weight within the group. At times it felt like I had to nag people to do things for me and I wasn't even the director. I think another part of the problem with our original film was that none of us wanted to quit. In hindsight we should have probably cut the film a long time ago to concentrate on a personal work because it was clear just after christmas that it was a slowly sinking ship. I think persevering was the right thing to do but I think we all persevered for a little too long and should have said that it was becoming too troublesome.
My skills at a technical level have improved the most. This year I was able to learn MEL scripting as well as try other things like nCloth, fur and RealFlow. This is what I have enjoyed the most - learning and developing. Most of the group project was troubleshooting with all the issues we ran into. At times it felt as though we were going two steps forward and one step back because as soon as something went well, we would face another problem. It helped me get a better understanding of Maya and ho to troubleshoot though. I was mainly supporting the team when they found issues and i would be the "go to" person to fix it. I have also learnt that I am not a very good animator and it is probably my weakest area. I can move a camera around okay but animating Melvin the cat and making it look good was probably one of my biggest personal achievements this year.
My other personal achievements were learning to use RealFlow (even though it was only the basics I still learnt it) and MEL scripting. I was surprised at how much satisfaction I got from creating a whole script for set driven keys without any reference or guide and from just using Maya.
Before this year I wasn't really sure what my specialism was. I had skills in most areas like modelling, rigging and animation but this year has given me a clear direction into where I want to be in the future and that is in the technical area of animation and visual effects. I will still keep those skills I had previously but I think I thrive with a challenge and I find the technical stuff more challenging.
I will continue to develop my skills going forward and also my showreel and even though this year has been extremely stressful, I glad I went through it because I feel like I know where I am heading in the future.
Sunday, 27 May 2012
Friday, 25 May 2012
Showreel
I have been looking at some technical showreels online and I think that I need to really improve mine. My old one was a miss mash of my work done over a couple of years but since then I have found what direction I wanted to go in and need to make a showreel that reflects that.
My showreel will not be able to compete with some studio showreels like the CineSite technical showreel and Studio Liddell. My showreel will show my technical skills. I thought about putting some ocean shader and wake tests but then I thought that it doesn't really show skill because they are just settings. What I decided to do instead was show me playing around with my rig, my blend shapes working and MEL scripting. All these videos will be sped up so that it will fit into under two minutes (they were originally about 10 minutes). As something extra, I have put the rig working and animated at the end so people can see the rig in action.
My showreel can be improved upon as I do better work and develop my skills after I leave university but at the moment this is what I will use to try to make an impression for employers.
The hardest part was choosing suitable music. Some music had sour language in and then with one track, I tried to loop the introduction which was just under a minute but I couldn't loop it and make it sound good, it was obvious it was repeating. In the end I went for a Daft Punk track called "Aerodynamic"which is just an instrumental piece. I faded out the end so that it didn't just come to an abrupt stop and layered it over my showreel.
I wasn't happy with my title pages because I thought the writing was too big and distorted slightly so I created some different title pages an in the end went with a more professional looking black with white writing. I also forgot to credit the music track artist so I added that in small italics at the bottom.
I think my showreel does have a theme because I use the same model throughout the piece. It is kind of a story from rigging to animation. It starts with me testing the rig on the cat and then viewing the blend shapes and leads to MEL scripting and ending with an animation test of the rig in action. There was a lot of other things I could have put into my showreel, like my nCloth tests, but I like the way it flows.
I have uploaded this to vimeo and youtube and below is the finished showreel.
Putting into folders
I have been trying to organise my things into my folders. This has taken me quite a lot of time because I have a lot of tests and images/screenshots that I have had to go through to pick out what is going to be in my videos for each folder and what I am going to put as images.
I had to organise and rename a lot of screenshots so I knew what they were so they were easy to identify when trying to organise them.
When I had organised them, I had to put them into After Effects and make them into videos. I was surprised how I felt the order of the video was important so most of my better work was either in the middle or at the end.
I think that if I had more time, I would focus on some more animation as that is my weakest folder. I am not entirely happy with my work because when it has been put into folders, it does not seem like a years work so I think it could have done with some more development and variation in some areas. It is too late to really develop anything else and start new projects but I am happy with the work that I have done.
Tuesday, 22 May 2012
Fur
I have been doing some tests to be able to add fur to the Melvin cat rig.
I had never used fur before so used my "Mastering Autodesk Maya 2011" to read up about it. In the book it gives you an example of a dog and explains how to add fur and paint the different attributes. This was a good starting point for me so I could then develop further.
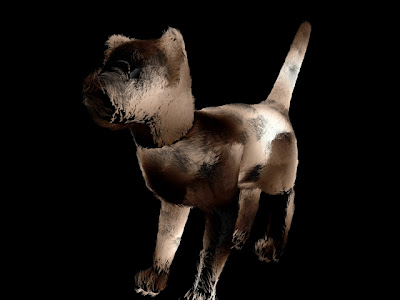
I firstly did a basic test to see how the outcome would look if I used a preset built into Maya. I used the Calico Cat preset but changed the base colour and tip colour to the same texture file that Sarah Strickland had created for the skin of the cat. Below was the outcome.


I had never used fur before so used my "Mastering Autodesk Maya 2011" to read up about it. In the book it gives you an example of a dog and explains how to add fur and paint the different attributes. This was a good starting point for me so I could then develop further.
I firstly did a basic test to see how the outcome would look if I used a preset built into Maya. I used the Calico Cat preset but changed the base colour and tip colour to the same texture file that Sarah Strickland had created for the skin of the cat. Below was the outcome.

This was not the outcome I was quite expecting but then I started to adjust some of the settings such as polar and inclination to get the fur going it the expected direction. The main way to control the fur was to keep playing around with the settings. I had to make the fur density more and the fur opacity higher and eventually I got something that resembled the cat fur I was looking for.

It still needed a lot of work so I continued to play with the settings so that the fur wasn't so straight and was more fuzzy. I wanted it slightly shorter as well rougher. The thing that really stood out though in every test I did was there were some bald patches that would not disappear. I tried increasing the density but the fur did not appear in the bald patches.
After some research online about this problem I started to look at baldness maps. I didn't want the fur on the inside of the ears and I could paint it so there was fur where there currently wasn't. The white mesh would be areas where there is fur and the darker the area, the less fur there would be. I tried to use the paint attributes tool to literally paint on the bald areas but it didn't work. There are some black spots in the image below that would not be painted white no matter what I did.

This lead me to create a custom baldness map. I started with the texture map and took it into photoshop to make it greyscale. There were some areas on the legs where I wanted fur but the area on the map was dark so I had to make some adjustments. When I added this map to the model, below is an image of how it turned out.

There are still some areas (like the bottom of the left leg) where it is still bald for no apparent reason. With that aside, with the baldness map, I was not very happy with the outcome. Some of the areas which are completely bald do not look natural. On the face for example, as the baldness becomes less, it looks strange because you see random strands of fur when the fur should gradually get longer instead.
To change this, rather than attaching a baldness map, I applied a map to the length. This meant all the darker areas would have shorter hair and the lighter areas would have longer hair. It was a lot easier to create because all I did was greyscale the texture map and adjust the contrast and brightness levels. This was the final map:

I had to continuously keep testing the brightness of the map to get the correct length for the fur. Once I was happy I attached it to the model and this was the outcome:

It needed some more tweaks but it was heading in the right direction and looking more like natural fur.
After experimenting more with the settings, I managed to achieve a balance of most of the attributes. The final fur image is below.

There are still some baldness issues on the front leg but I cannot find a way to get rid of it. I have researched on the internet and even posted on some forums but no one seems to know why it could be happening. I had to admit defeat on this problem as I don't think I will be able to resolve the issue anytime soon. Instead I decided to turn my attention to scripting again.
I found a fur script online for a bear and decided to take a look at it. The script is basically a list of all the fur attributes and their values. It was surprisingly simple to me how easy it would be to replicate the fur I created above in a script. The only issue I would have is the base and tip colour attributes because I am using a texture file. If it was a plain colour with set colour values it would be a lot easier but I am not sure how I would be able to add a texture file to the script for others to download. If it was only for myself then I would add a file path into the tip and base colour attributes section.
This is something I will look to develop in the future as to write a script as large as is required to make it work instantly for my model would take a lot of time which I am currently short of. It would definitely something to help me with my scripting skills in the future.
Thursday, 17 May 2012
Wireframe Rendering
For my artist folder, I have done a lot of modelling. I wanted to show the polys on my models so I was looking for a way to render so it shows the wireframe.
I found a way to use mental ray so it would render out the wireframe of my models by looking at a couple of forums and also looking at a book called "Mastering Autodesk Maya" by Eric Teller which tells you about rendering settings. From these sources, I pieced together a good method of allowing the wireframe to be rendered.
The first step was to create a new material and then go to the shading groups and find that material. Then select it and go to the attribute editor. Under the shading group material there is a mental ray section. It then allows you to select contour shading on. I adjusted the settings so that the colour of the contours were black and that were not completely visible (the alpha channel to 0.750) then the thickness to just 0.5. In the attributes of the material, I made the colour a slightly lighter grey.
In the render settings, when mental ray is chosen as the renderer, there is a features tab. In there is contour rendering options. I made sure it is ticked on there and then under "Draw by property difference" I ticked on "around all poly faces".
When the new material is applied to the objects it renders out like in the image below. The left images are when the contour rendering has been applied and the right images are the models with the original materials applied.

I have used contour rendering with all my models and for most of them, have used with a turntable animation so the wireframe can be seen at all angles.
Tuesday, 15 May 2012
Melvin Interacting
I wanted to create an animation showing Melvin the cat interacting with things in the scene.
I thought about doing a cat interacting with a box but after playing around with the rig, it would be very hard to achieve without breaking some parts of the rig. In the end I decided to create a cat nuzzling past the box.
I used my parents cat for reference again this time because she always nuzzles against most surfaces. The main thing that I noticed was that when they nuzzle against things, their whole body goes against the thing they are nuzzling. I tired to get this across.
I put in the key poses first to try and get a main idea about how the cat would interact. Below are a couple of key poses to get an idea of how the cat will act


I tried to pick the best angle to show the body against the box and the face nuzzling. This was then rendered out.
I thought about doing a cat interacting with a box but after playing around with the rig, it would be very hard to achieve without breaking some parts of the rig. In the end I decided to create a cat nuzzling past the box.
I used my parents cat for reference again this time because she always nuzzles against most surfaces. The main thing that I noticed was that when they nuzzle against things, their whole body goes against the thing they are nuzzling. I tired to get this across.
I put in the key poses first to try and get a main idea about how the cat would interact. Below are a couple of key poses to get an idea of how the cat will act

I wanted to have the whole body leaning up against the box even when the cat was walking along.

This is the cat face nuzzling against the box. The cat is pushing its whole front of the body into pushing the face against the box.
There was mainly walking in this shot but because the box was in the way, the walk had to adjust to a change of path. It also had to have its weight shifted against the box.
The main troubles I had with this were animating the tail because the controls are not very good to get a flick. If I were to do the rig again I would not use the spline IK handle tool, even though most books and riggers recommend it for tails and spines etc, in this case i needed more control over the tail which this IK did not give me and became very frustrating. The other issue I had was sipping in the feet. As the cat was walking I kept having to adjust the feet so they would not slip. Whenever I adjusted the feet at one point or moved the body to get rid of the slipping, it would effect it somewhere else. I mainly used the graph editor to rectify the issue but no matter how hard I tried, there was still some slipping. I tried to make it as unnoticeable as possible.
Here are the play blasts of my interaction animation.
I tried to pick the best angle to show the body against the box and the face nuzzling. This was then rendered out.
Friday, 11 May 2012
Cat jump
I have doing some more tests with Melvin the cat. I decided to try to animate him jumping onto a plinth. The reason I am doing this is because this nation has a lot of anticipation and secondary action with the tail. I thought it would be good to try and stretch my animation skills.
Firstly, I had to try and find some reference footage. I do not live with a cat and the cats that live around me tend to hind so my best source was YouTube. I found a good video with a cat called Maru jumping into a large box. It did not show me how cats would land on a plinth but it gave me good reference for how a cat would prepare to jump. Below is the video from YouTube.
For the landing, I used my parents cat and watched her as she climbed onto my parents windowsill. I didn't manage to catch it on video but she always is going up onto the windowsill so I managed to catch her quite a few times.
From this I was able to animate a jump scene. The only problems I had were to do with the shoulders, back legs and the tail, when they are pushed forward too far then they start to protrude out from the chest. When doing a jump though, there are parts when the cats shoulders are extremely forward especially mid jump when both pairs of legs are stretched out. The back legs had to be scrunched up when climbing onto the plinth and at some points, for a very short amount of time, the legs go inside the thigh. The hardest thing was the tail. The controls do not allow the tail to flick very easily so there were some parts where I wanted the tail to flick, but I couldn't get it to.
When I was finished, it was hard to see everything from one angle so I took some play blasts from different angles and then only rendered from one angle. This was because there are subtle movements like the bottom when the cat s about to jump. These may be missed if it is only seen from one angle.
Friday, 4 May 2012
Melvin walk cycle
I used Melvin the cat to create walk cycle. This was meant as a test to test the rig and to see if I could animate a quadruped walk cycle as I have never tried one before with my own rig.
The first try was a little too slow. I was using 24 per step but when that was played back in Maya it seemed very fast and too fast to see properly. I highlighted all the frames and dragged them so it was now around 40 frames a step. When I play blasted this, I realised it was far too slow.
I re-adjusted the timing and made a few changes to the head as it was a little bit too static so I added a small bounce in there. I tried to change a slight pop in his elbow as he picks up his front paw but every attempt I made, he would still have the slight pop.
The walk is slightly faster and around about 30 frames a step now.
I rendered this out to see how it would look without all the controls. I rendered on a green background so that it stands out as I used Maya's default lighting. I don't think it is too bad for a walk cycle. It has made me realise there is still a painted weight issue on the other side of the body on the back leg because it creases when it bends. I cannot work out why the elbow pops but I have now added a heel roll onto each paw after this walk cycle because I realised that it would have been useful and made it look more natural.
Wednesday, 2 May 2012
Change of plan ... Again
The deadline is getting closer but I have decided to explore a different avenue. I was going to do a smaller animation with Melvin the cat but I have almost run out of things to do on the project.
My interests are within the technical side of animation and so far for Melvin, I have remodelled the cat, UV mapped Melvin and re-rigged him. I have also created nCloth curtains for the scene and explored MEL scripting for set driven keys and fur. My main priority was to fill my folders for this unit but I have covered my artist folder with all my modelling and concept drawings. I have covered my animation folder with animation for the Cat and Rat film and also animation tests that I am going to use Melvin for to test my rig. I think rather than continuing on with this small project, I have decided to carry on learning and developing my technical skills and create a showreel for the degree show that will reflect this.
My skills are not needed for the smaller project anymore so I think this would be the best way for m to show my skill set and develop further. There are areas I would still like to explore further such as develop fur and baldness maps so the time I have left for this unit will allow me to go in a different direction and give me an opportunity to develop my showreel for the degree show.
Tuesday, 1 May 2012
nCloth curtains
For the short animation with Melvin the cat, there are some curtains. I have decided to use nCloth because they will be near the open french doors in the scene so wind will be able to affect them. The cat will also be able to interact with the curtains if we use nCloth for them.
I found some tutorials about nCloth online to start off with. It showed me the basics about how to assign the nCloth to the mesh and how the different constraints will effect the usability of the curtain. I made a basic curtain and used the sine deformer to create the wavy curtain effect.
This was a great start but I wanted smaller curtains and on both sides. I applied the same methods to create the single curtain to create a set and changed some of the settings so that there was more fiction on the curtain rail. I made the curtains slightly thicker and more stretch resistant and well as tweaking some other attributes like stickiness and rigidity to adjust them so they looked more natural. I did another test of the curtains drawing and being pushed back again just to see how they reacted.
These curtains were still movie around slightly at the beginning but I put that down to the wind attribute being set up so there was some slight movement as if wind was affecting them. When I was happy with them I decided to take this test further. I have only tested collisions when I was using nCloth for the emperor but had never tested it with an object going through them. I used the Melvin cat rig to interact with the curtains to see how it would look if Melvin was to pass through them or try to climb underneath them. To do this, I made his mesh into a collision and then animated him as normal.
I liked the way the curtain reacted and thought it could make a nice shot if the angle was correct. I played around with camera angles to see if I could get a better one and made some minor setting adjustments to rigidity and stickiness. The test that I created will not make it into any animation or film which is why I did not render it out properly but it shows how the cat could react if they do want the cat to go through the curtain in the animation.
Monday, 30 April 2012
Rigging Melvin
We have named the cat Melvin and I have just finished rigging him.
It taught me some new techniques especially about using spline IK handles rather then normal IK handles.
One valuable lesson I did learn whilst rigging was to always freeze transformations as you go. I had a lot of trouble after I had finished the rig as I hadn't frozen any transformations. This meant I could not reset the position of my character properly. In the end, it was a case of carefully undoing parts of my work, freezing transformations and re-doing them again.
I think the rig can be improved and if I were to do this again, I would probably not use circles for every single handle as when you use them, especially for the neck, they can easily get lost within the body. When I was rigging the rat in the last project, I coloured the handles depending on which side of the body they were for. I did not do this with this rig but I would next time only for the fact that the pole vectors get lost amongst each other when moving the cat around and when legs start to cross over each other it can get confusing.
I have found it hard to paint weights which I did not do for my previous rigs but this cat had quite a lot of vertices and I would find that when I moved a handle one way (usually the chest), if I moved it the other way, it would distort and crease. The painting weights on this cat are a constant work in progress as the more I move the cat around and push poses, I find a weight that needs addressing so this will probably continue to happen and continue to be addressed.
This rig needed more movement than previous rigs so I got to use set driven keys to bend and stretch the toes and blend shapes so that the cat can shut it's eyes. The ears had to have movement as well which could have been done using blend shapes (that method was used with the previous cat rig) but it was not very successful so I used joints this time to give them more freedom. That meant they can go in any direction and fold over or go to the side without having to re-model and adjust cat models to create blend shapes.
Below is a video of the melvin cat rig:
Friday, 27 April 2012
Blend Shapes
The cat needs to be able to sleep and therefore shut it eyes. To do this I have been looking into blend shapes. I remember a brief lesson on blend shapes in the first year so I know that I had to create a separate model with the desired action on it (i.e a model of the cat with its eyes shut).
I used reference images and managed to model one eye shut that looked quite cat-like.

Firstly I tried to delete the history and freeze transformations to see if that made any difference but it was still the same. I tried exporting the model with the shut eyes as a .obj file and then reimporting it to see if that would solve the problem but it was still the same.
In the end I turned to the internet and researched the issue. I came across a forum where someone mentioned that the topology and vertex order had to be the same or similar for the blend shape to work.
In a book I have been reading called "Mastering Autodesk Maya" by Eric Keller there is a small section about importing without any vertex order being disturbed by using the option box when importing. So I tried to reimport the model without disturbing the vertex order.
It wasn't until I had tried all of these methods that I realised that mirroring geometry would probably mess up the vertex order, especially when I was sewing vertices back together around the head and neck.
This mad me realise that I would have to start again so duplicate the original mesh (with the open eyes) and model each eye closed separately rather than using shortcuts and mirroring the geometry. This did take longer but it also allowed me to shut the eyes independently whereas before I was going to have only one control to shut both eyes. It has also meant that the topology and vertex order has stayed the same or similar to the original model.
I added attributes so that I could control the blend shapes in the channel box and created the blend shapes. This then worked straight away without any problems.
I used reference images and managed to model one eye shut that looked quite cat-like.

It did take me several attempts so rather than having to model the eye shut on the other side of the face too, I deleted half the face and mirrored the geometry so that they would be exactly the same.
With this model with the shut eyes I tired to create a blend shape. This was the outcome:
Firstly I tried to delete the history and freeze transformations to see if that made any difference but it was still the same. I tried exporting the model with the shut eyes as a .obj file and then reimporting it to see if that would solve the problem but it was still the same.
In the end I turned to the internet and researched the issue. I came across a forum where someone mentioned that the topology and vertex order had to be the same or similar for the blend shape to work.
In a book I have been reading called "Mastering Autodesk Maya" by Eric Keller there is a small section about importing without any vertex order being disturbed by using the option box when importing. So I tried to reimport the model without disturbing the vertex order.
It wasn't until I had tried all of these methods that I realised that mirroring geometry would probably mess up the vertex order, especially when I was sewing vertices back together around the head and neck.
This mad me realise that I would have to start again so duplicate the original mesh (with the open eyes) and model each eye closed separately rather than using shortcuts and mirroring the geometry. This did take longer but it also allowed me to shut the eyes independently whereas before I was going to have only one control to shut both eyes. It has also meant that the topology and vertex order has stayed the same or similar to the original model.
I added attributes so that I could control the blend shapes in the channel box and created the blend shapes. This then worked straight away without any problems.
Tuesday, 24 April 2012
Set driven keys using MEL scripting
I have been rigging the cat again. For the cat we need for the new project, we need more control in the paws and ears.
After speaking with Dan about what I want to do in the future, he suggested I start looking into MEL scripting. I started to have a look at simple code like selecting things, de-selecting things, creating objects, moving objects etc. I thought it would be good to practice more advanced script so whilst rigging the cat, I have left the script editor open so I can see the script as I do things.
I have been keeping the script editor open and looking at the script every time I do something. This has given me an idea of how the script will look and has allowed me to deconstruct the script so when I write script, I know what to write to make it do certain things. It has meant learning script has become quite easy and fast so that I could create my own scripts shortly afterwards.
This lead me to figure out how to create set driven keys for the cat's paws. I created script to key each toe to the driver that I selected. I had to then move the joints manually as I have not quite finessed that part yet but then could key each movement to the driver to create the desired effect.
This was the script, it is only for one foot at a time and one driven key at a time.
setDrivenKeyframe -currentDriver Rightbackfootcontrol.Bend Rightbackfirsttoe1.translateX;
setDrivenKeyframe -currentDriver Rightbackfootcontrol.Bend Rightbackfirsttoe1.rotateZ;
setDrivenKeyframe -currentDriver Rightbackfootcontrol.Bend Rightbacksecondtoe1.translateX;
setDrivenKeyframe -currentDriver Rightbackfootcontrol.Bend Rightbacksecondtoe1.rotateZ;
setDrivenKeyframe -currentDriver Rightbackfootcontrol.Bend Rightbackthirdtoe1.translateX;
setDrivenKeyframe -currentDriver Rightbackfootcontrol.Bend Rightbackthirdtoe1.rotateZ;
setDrivenKeyframe -currentDriver Rightbackfootcontrol.Bend Rightbackfourthtoe1.translateX;
setDrivenKeyframe -currentDriver Rightbackfootcontrol.Bend Rightbackfourthtoe1.rotateZ;
I had to change the attribute name for each foot and for each driver. For example this was to create set driven keys for the bend attribute but for the stretch attribute each section of script would be changed to:
setDrivenKeyframe -currentDriver Rightbackfootcontrol.Stretch Rightbackfirsttoe1.translateX;
setDrivenKeyframe -currentDriver Rightbackfootcontrol.Stretch Rightbackfirsttoe1.translateY;
setDrivenKeyframe -currentDriver Rightbackfootcontrol.Stretch Rightbackfirsttoe1.rotateZ;
The stretch effects more attributes so they have also been added. The name of the control would change with each foot too depending on what I have named them. After writing all the script, this was the final outcome.
Thursday, 19 April 2012
Cigarette Smoke
Russell Pointer has asked me to add cigarette smoke effect to his shot of a monkey picking up a smoking cigarette.
This was the video clip he has given me:
I have used Maya to create the smoke and exported each image as a .png so that the background will be see through. I will then use After Effects to layer the smoke over the video and move it accordingly when the cigarette moves.
I created a 2D container and fluid emitter. It has then been a case of changing the settings to create the smoke effect. Cigarette smoke is quite slow and curly. It disperses quite quickly and is a light grey colour. All this was what I had to make my cigarette smoke look like.
With the emitter, the smoke creates a ball shape as it comes out of the emitter. So it looked more realistic, and looks like it is coming out of the end of the cigarette, I made a cylinder cigarette shape and coloured it bright green so that it could be keyed out in After Effects afterwards.
This was the smoke test in Maya.
When I put it into After Effects, the cigarette shape was harder to key out that imagined because of the shadow on the cylinder. When I tried to key out the shadow, the cigarette was a similar colour so it keyed out some smoke as well. The way I got around this was to create a layer mask over the cigarette rather than key it out so it will definitely cover the whole cigarette.
This was the final outcome when added to the video Russell gave me.
The smoke curling at the top is quite hard to see but the video is only a couple of seconds long so it doesn't matter too much. The only other thing that could be improved was a red tip on the cigarette so it looks like it is still alight but that would mean Russell would have to reshoot the whole shot.
Tuesday, 17 April 2012
UV mapping the new cat/Fur test
Because I have changed the topology of the cat for the new idea, I have had UV map the cat. Sarah Strickland UV mapped the last cat so I offered to UV map the new cat.
It took me quite a long time to UV map but I eventually got quite a clean, clean map. I soon released a problem with it when I did a very quick fur test. This was the outcome:
Most of the sections of UVs are joined together (i.e the chest is attached to the main body, the legs were at strange angles). See below for UV map.

The only way I could see to resolve this was to change the UV map. I had to detach some areas like the chest and front of the thighs so that the UVs would then all go in the same direction and there fore the fur would appear more natural.
This was the final UV map which I passed onto Sarah so she could paint the texture.

It took me quite a long time to UV map but I eventually got quite a clean, clean map. I soon released a problem with it when I did a very quick fur test. This was the outcome:

Most of the sections of UVs are joined together (i.e the chest is attached to the main body, the legs were at strange angles). See below for UV map.

By moving the UVs around I discovered that the direction of the UVs have an effect on the direction of the fur. This meant that when I added the fur, the direction of the fur would be unnatural in some areas. For example, the fur on the back would go towards the tail but the fur on the chest would go towards the right. This was because of how the UVs were laid out. I tried to change the inclination and roll settings to make it all go the natural way but I could not get it to ALL be in a natural direction.
The only way I could see to resolve this was to change the UV map. I had to detach some areas like the chest and front of the thighs so that the UVs would then all go in the same direction and there fore the fur would appear more natural.
This was the final UV map which I passed onto Sarah so she could paint the texture.

Monday, 16 April 2012
Whiskey Bottle
As the Cat and Rat film was cut, I spoke to some groups to see if they needed any work doing. Russell Pointer asked if I could create whiskey in a bottle.
He sent me a file with an empty whiskey bottle and asked if I could make it look as though whiskey was inside. This a render of the file Russell sent me:
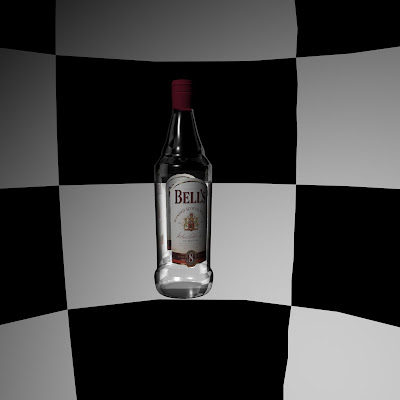


He sent me a file with an empty whiskey bottle and asked if I could make it look as though whiskey was inside. This a render of the file Russell sent me:

Firstly, I saw that the label did not look quite right and slightly squashed so I changed the UVs so that it looked more like a real label on Bell's whiskey.
To add the liquid, I first duplicated the model, made it slightly smaller and deleted some faces to make it look like liquid was not quite to the top. I added a blinn shader, so it had some reflective and refractive properties, and then put it inside the bottle. After adjusting some settings and changing the colour as well as even changing the shader to a phong, this was the result.

The problems with this is that the material is not clear enough so it looks cloudy and unlike whiskey at all.
I did some research into some mental ray materials which would give a better effect than a bling or phong. I ended up using dielectric materials for the glass and whiskey (changing the colour for the whiskey). These give better control over reflection and refraction and give a more fluid looking shader.
Using these materials this was the end result.

Saturday, 14 April 2012
Changing the cat
For our new idea, I decided to change the cat slightly. This is because the old cat was quite cartoony with large ears and spikes at the side as tufts of fur which we didn't need anymore as we are going for a less cartoony feel. (Below is the previous model for the cat).


There were too many polygons around some areas which caused a lot more problems when it came to rigging and animating.
By changing my model of the cat, I cut down the amount of polygons and got rid of the spike features as well as change the size of the ears. I can also re-rig the cat as we need the cat to have more control so it can do more things, such as stretch its toes and sniff, which we could not do with the last rig. By simplifying the model, it should make rigging and painting weights easier to.
This is the new cat model.

There are still quite a lot of polygons around the legs but that is due to the toes. They need to be quite rounded so have had to add more edges creating these extra polygons. The chest area, tail and face all have fewer polygons but still retaining the shape.
This can now be re-rigged and I will create blend shapes which allow the cat to close it's eyes more realistically rather than have eyelids like the previous model did.
Thursday, 12 April 2012
Cut the film - Future Plans
Today we had our presentations to see how we were getting on. After a meeting with the tutors, we agreed to cut our Cat and Rat film. We have all put a lot of effort into it but we keep coming across more and more issues. Currently we have not tried to get the animals to interact with the water and this could be a huge task that I don't think we would be able to handle with the deadline we have.
I think it is a good decision and means we can all focus on other projects and personal work to make better showreels but also use our skills to help other groups.
One of the options our tutors gave our group was to create a much shorter 30 second animation just show casing our best skills. On discussion with Sarah Strickland, we have decided to make a short animation of our cat (from the Cat and Rat film) in a different setting - a room with french windows. The cat will walk into the room, interact with the curtains around the doors and then jump onto the windowsill to look out into the garden.
We already have the cat model and would just need to model the room with french windows and curtains. We will probably use nCloth for the curtains to make it easier to interact with the cat.
This plan still needs to be finalised but in the mean time I have spoken to a few groups to see if they need any help with their films. So far Russell Pointer and Aaran Dummer have offered to let me help them with any work they need doing in the coming weeks.
I will also be working on my personal showreel so I can produce something for the degree show.
Monday, 9 April 2012
nCloth and Emperor
For the emperor's robes we all wanted to use nCloth. When I was trying it out though, there seemed to be many problems that I had to try to resolve.
Other people in the group had tried to use nCloth on the emperor too but it keeps slipping through him like it is just falling through the air:
I went a bit further with it and tried to constrain it but this time it would stay on the model but just pass through his skin like it wasn't there. I experimented with the different types of constraints to see which would create the best effect.
None of the constraints would keep the cloth from going through the skin so I looked at other methods to keep the cloth on the body. I decided that rather constrain it, I could make the emperor body a collision so that the robe would interact with the emperor and not fall through it.
This was making progress as at least it was not falling through the emperor completely. In previous projects I had to make an nCloth curtain so I knew about the different types of constraints. Now that the cloth is recognising that there is something in the way I just needed it to stay at the top. I added a constraint to some of the vertices at the back of the robe around the collar at the top and constrained it to the emperor body. This was the effect it gave me.
This was almost exactly what we were after and trying to achieve. To get to this stage it has taken me many hours to figure out and experiment and the next thing I needed to work out was to how to get the cloth to move when the body moves. I tried moving the arm but the cloth would not go with it. The cloth was still working but because the collision was not in the way, it fell to the emperor's side.
I've spent a long time trying to experiment with different constraints but none of the options will allow the cloth to move with the arm when repositioning the emperor. The closest I got was constraining the points of the cloth to the surface of the body but that still meant the cloth would not stay around the arm entirely, it would just stay near the arm which is no good.
After experimenting some more, I discovered that the nCloth would move with the arm but only if the arm's starting position was in the same position that the nCloth was created. If you moved the arm during the animation then it would move with the arm but if you position the arm first then the nCloth does not follow it.
This does make it slightly difficult because it means that the first pose has to always be the same for the nCloth to follow. We do not necessarily have to show the model moving into the first key position because that can be cut out later on but it would still have to be rendered for the simulation to work and the nCloth to follow properly.
As a group we still have a lot of work to do and trying to work out the nCloth has taken up much of it. Another consideration is the render times. Using nCloth will increase the render time of each shot massively. James came up with another method which was to use the wrap deformer to get the sleeves to follow the model. It works and does not effect the render times like nCoth does but it does have some problems. The main problem with it is that when the wrist rotates or bends, the sleeve rotates and bends with it, it does not stay pointing down like gravity would effect the sleeve.

It is not ideal but using the wrap deformer may be the only way we can animate the emperor's robe without wasting render time. If possible we will use the nCloth as it will react to the wind and behave as desired.
Thursday, 5 April 2012
Problems with Cat rig
I have been looking more at the cat rig that James Waters originally rigged. Now that we are starting to do some animating with it there are some small bugs that are beginning to become a small problem.
This first video shows the problems with the rig. The ankle bends unnaturally so that the can cannot straighten it's foot. It always has a constant bend as the ankle joint is too high. The second problem which is shown in the video is that when the bottom is moved (like a sitting action), the underneath folds unnaturally and causes creases.
To resolve the ankle joint issue I had to remove the bound skin, remove the IK handles from the foot and move the joint to a better position. There seemed to be an extra, unnecessary joint in the middle of the forearm so I also removed that so it gave the cat a more natural skeleton. I had to re-add the IK handle once the joints were moved into place and parent it to the controller again. Before re-skinning the cat, I made sure the movement was looking better. I also repeated these actions on the other front leg. Finally, I re-skinned the cat.
I did not want to have to repaint all the weights for most of the cat so before unbinding the skin before moving the joint, I exported the weights of the cat. When it came to re-skinning, I imported the painted weights onto the cat and then only had to adjust the front legs.
Whilst repainting the weights for the front legs, I looked at the weights for the bottom joint to smooth out the creases. It took quite some time to sort out the creases because in the end, I removed all the influences from the vertices around that area and then re-added them by slowly building up the weight and constantly switching between joints to make sure the influences were then correct.
This second video shows how the rig responds now. The ankles have a more natural bend and creasing no longer occurs on the underneath of the cat.
Wednesday, 4 April 2012
Texturing the Emperor
We are about to finish the emperor model, James Waters is just finishing the rig but before we paint the weights I need to texture him. The main colour that he has is on his robe and his hat. As it is oriental, the obvious main colours to use for his robe would be yellow, green and red. For his skin, I have tested a few flesh tones but it looks more natural he is a tanned colour. It also compliments the grey of his hair more. He does not have much hair but he has quite thick eyebrows and a large beard and moustache which are going to be a mid grey colour.
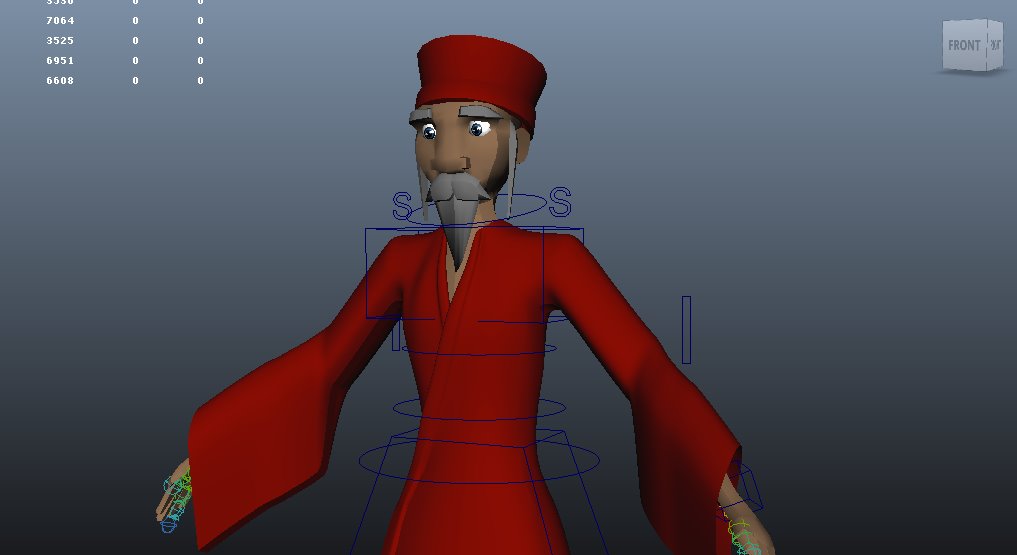
At the moment nothing in the scene is yellow so it would make him stand out more. If it was a golden yellow colour it would also make him look more royal and important. He is going to spend all of his time in the pavilion so this would contrast against the red which could work really well. This is what he looks like in yellow.

The next colour test was red. The red I used was the same red that I used for the pavilion because if I used a slightly different red it would have been obvious and looked like bad colour matching. I think the red would make him stand out against the environment but not against the pavilion which could be a problem in shots where he is far away as he would just merge into the pavilion. This is what he looks like in red.
The final colour is green. There is a lot of green in our scene because of the environment. It is a darker green so makes him look quite rich and does help to make him stand out from the background. He could easily get lost in the background and in one of the shots where the background moves behind him, it could look confusing. Here is what he looks like in green.

I have put all of these to the group to see which they prefer but personally I prefer the yellow as it stands out more and would not get lost in the scene. I think the group agree with me too so yellow is the most likely colour to get chosen.
Tuesday, 3 April 2012
VRay lines and the river
I have been working on a shot which is where the emperor says "you must cross the widest point of the river".
It is quite a simple shot because it is just a camera establishing the river so it goes from one bank to the other.
It did not take me long to create the camera and animate it. I did run into some rendering problems. Each frame takes about 5 minutes to render because of all the items and lights, textures etc in the scene. It has been a very slow process because I had to render the scene wife. Once in VRay for most of the scene and then mental ray for the river.
I had to composite them in After Effects and this was the outcome.
In the shot you can see a few problems. First of all you can see the edge of the scene. At the point where the camera crosses the river, there is no environment past the last mountain. Secondly, the VRay lines around the river do not match up in some places with the river itself. Thirdly, the camera is looking down too much so all you can see is the river and is not very interesting.
There are way to resolve two out of the three problems. The problem with the environment can be sorted by painting the rest of the environment in. There is a globe that covers the whole environment and it has the sky texture on. If one of the artists in the group (Sarah Strickland or Lily Blacknell) could paint some more environment, even if it was just a bend in the river, so it looks like the environment carries on for a while rather than stops dead. We could say there is a waterfall or drop there but the water would have to go in the other direction and there are usually rock at the top of waterfalls which would have to be modelled and placed in the scene. This would have to be discussed and then could be added to the sky texture onto the globe.
The problem with the camera can be easily sorted. I have made it so the trees and pavilion are visible for longer but so you can still see the water. This also allows the audience to see where the animals have to finish the race. It makes the shot a little more interesting for the viewer.
The last problem is the hardest to solve. The VRay lines do not exactly match to the river. The problem is, I cannot move the river layer around very much because it aligns with the stairs and edges of the banks. Even if I was able to move the layer around more, where some VRay lines do match, others do not.
After some research on the internet and autodesk and VRay help sections, I have found the reason for this. When I render the environment in VRay, it does not render the actual river itself but it creates a line around the plane which the ocean shader is assigned too. This would be fine and align perfectly except that the ocean shader, when rendered is not just a plane. The ocean shader has ripple and ebbs on the banks and against the sides so it is never just flat like a plane. Also, because the ocean shader interacts to settings like turbulence and objects, you could never render a black outline around it because it means the line would have to move as the waves move up and down.
The river and VRay lines will never match up completely but it is only a small difference and it could add character to the piece. It makes it a little bit more interesting for the audience.
Monday, 2 April 2012
Shot 3 - They ate together
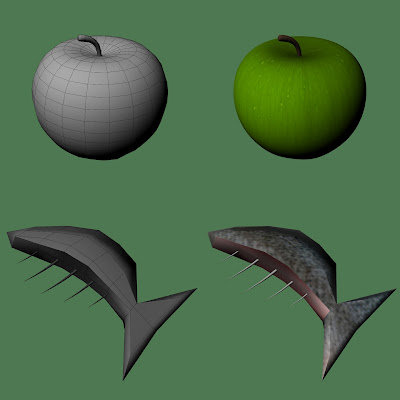
Fot his shot I had to model some extra objects which were an apple and a dead fish. Originally, the apple was going to be some cheese but then I thought about where the cheese would have come from in our scene. An apple could easily fall from one of the trees and could also be used in our "they played together" shot.
The objects are quite basic but here are what they look like:


The background of this shot was just a still image of a small area of our environment scene. The animation was rendered as .png so it would not have a background and was easily layered over the image in After Effects. The swills were created in Photoshop and then layered over and animated within After Effects so they moved as well. The music and narration still has to be added to this shot.
The objects are quite basic but here are what they look like:


The animals do not have mouths so I had to animate them so it looked like they were eating without opening their mouths. I did this by just adding the movement to their heads. For secondary animation, I added a swing to the cat's tail. The rat's tail is static because he was on his hind legs so his tail was on the ground which would not move a great amount. The cat's tail was up in the air because she was bending down to eat. I thought it would look unnatural if her tail was staid too.
This shot is not crucial to the storyline and is sort of a flashback to what they do together, so we decided to show it is different, to add some curvy animated lines around the action. When this was layered over the shot, this was my first attempt.
I did not realise how slow the movement of them eating was until I had put the scene together. I realised that I should have used play blasts within Maya to help with the timing. With this noticed, I went back to Maya to speed up the movement of their eating.
The play blast goes on for longer than the shot but this will be edited afterwards. The movement of eating has better timing and works well with the speed of the tail swinging. When I was happy with this, I put this into the final edit of the shot.
The background of this shot was just a still image of a small area of our environment scene. The animation was rendered as .png so it would not have a background and was easily layered over the image in After Effects. The swills were created in Photoshop and then layered over and animated within After Effects so they moved as well. The music and narration still has to be added to this shot.
Sunday, 1 April 2012
Lighting
I have been working on the shot where the emperor says "You must cross the river at it's widest point".
The camera pans across the river and both sides of the environment are shown. In the scene there was basic lighting set up so that the sky would be illuminated and also the environment. This is how the scene looks with basic lighting:


The camera pans across the river and both sides of the environment are shown. In the scene there was basic lighting set up so that the sky would be illuminated and also the environment. This is how the scene looks with basic lighting:

The environment in the foreground does look quite dark and the texture looks like there are lots of shadows. I did not anticipate that when the camera is facing the other side, the lighting is a lot darker.

Not only is it a lot darker but you can see the light cutting across the sky making an obvious shadow. I soon realised that I would have to re-light the whole scene. It also meant that any scenes we had rendered earlier had to be re-rendered for the lighting to match. It seems obvious to me now that we should have checked the scene's lighting before we had begun creating shots but at the time I just didn't think about it and presumed because it was fine on one side, it would be fine on the other side too.
The first thing I tried to do in order to fix the lighting was to create another light but have it pointing to wards the other side of the scene. To do this I just mirrored the existing light. I kept the light that was illuminating the sky because it had no effect on the mesh of the environment, it only shone of the sky.
The results of the mirroring were disastrous.

The lighting was better on this side now but the sky had completely whited out so you could not see it at all. I can still see the shadow of one of the lights in the top left corner, where only one reaches. I changed the settings of the lights so that the intensity was halved for each of them.

This looked better but there were still some dark areas, like on the stairs, which I knew we would need to be lit properly for scenes later on in the film. The lights still cast shadows which were visible in the sky but as long as the camera did not go any further round than in the image above, then they would not be visible.
I was not happy with this lighting still because a lot of the scenes would have to be cleverly positioned to cover some mistakes with the lighting and that was something I did not want to worry about.
Last year, I created a tutorial about HDRI lighting so picked up some tips and tricks about surface shaders and reflected and refracted light. I used these techniques to try a different method of lighting the scene.
I turned the globe with the sky texture that surrounded the environment into a surface shader and allowed reflections off of it. This would help bounce the light around the scene but keep the texture of the sky visible. I deleted some of the extra lights that were now not needed so that it would stop the scene from whiting out. The last thing to do was change the render settings in VRay and the indirect illumination tab, I turned all the top three options on which were reflective caustics and refractive caustics. I rendered out the scene:
It had made the scene a lot brighter and the colours appear more vibrant. The scene if anything was a little bit too bright but in most of the scenes the camera is close up to a character and the lighting looks perfect. It also means there are no dark areas to shy away from from so no one will need to worry about hiding unwanted shadows.
Friday, 30 March 2012
Shot List
So the whole group can see what we need to achieve, I have complied a shot list for us all to refer to. This shot list has been created using the new screenplay and animatic that me and Sarah Strickland re-wrote so the story flowed better and made more sense to the audience. It also meant we all knew the story fully and there was no longer confusion over what happens in some parts of the story.
The shot list will allow us to split the shots between each person depending on their skills. Some shots need less animation than others so the character animators in the group (James Waters and Lily Blacknell) can start on the more animated shots.
Shot List
Establishing environment shot *
Cat and Rat introduction *
"They ate together"
"They played together"
"They slept together"
Emperor introduction *
Blank zodiac wheel in pavilion with Emperor *
River establishing shot (widest point) *
Cat and Rat talking into Ox's ear
They climb onto Ox's back
Wide shot of Ox going into river
Cat and Rat fall asleep on Ox's back
Rat wakes up
Over the rat's shoulder shot of finish line/pavilion *
Rat looks into camera with glint in the eye *
Rat sniffs in the air for Cat's attention
Cat and Rat reflection in river - looking at fish *
Rat pushes Cat
Over the Cat's shoulder of Ox swimming away *
Ox trying to get up the bank - Rat jumps in front
Rat jumping up the stairs *
Emperor head shot with a "knowing smile" *
Cat struggling on log and swimming to bank
Emperor in the way of environment - end of race *
Full zodiac wheel with all the animals *
Cat and Rat facing away from each other *
All the shots with a * after them are the potentially easier shots so probably the shots we will start with. There are 26 shots in total and each shot ranges from only 4 seconds to the longest being 10 seconds. The easier shots, we should be able to get rendered and completed quite quickly once all the models and environment is finalised.
Wednesday, 21 March 2012
Shot 2 - Intro to the cat and the rat
There was not a lot of direction as to what I should do to introduce the cat and the rat. In my own storyboards that I had started, I had a cheesy "popping up" action when they were introduced. Below is the storyboard panel I drew for this shot. I was not told to do any other action for this shot so I thought I would try it.

The first issue I had was perspective. The rat is much smaller than the cat so to get it to look like the storyboard, The rat would have to be very close to the camera and the cat further away. When I tried this and positioned them, it didn't look right. The rat's head became almost as large as the cat's and it was hard to get them both in shot without getting other body parts in there too. The other body parts would not have been such a problem but there were some issues with the rigs so I was trying to hide most of the body but it just didn't work.
For the background, I used another still image of a small area of the environment so when this was out behind the two characters, the proportion and perspective did not match up.
To resolve these issues, I decided to introduce them another way. I put the rat on top of the cat's head so that the cat would pop up first and then the rat would appear from behind the cat's head slightly later. This looked like quite a friendly gesture when they were positioned this way too which added to the point that they were friends.
I did some tests to get the timing right for the shot.
The popping up action was still little slow but I didn't want to make it too fast. In the end, I got the shot timing almost perfect and then any adjustments that I needed to make, I used time remapping in After Effects.
I put all the elements together and then rendered them.
I don't think this is the best way to introduce the characters but it was only supposed to be a test until the decision was made on how the characters would be introduced. In the end, this shot was the only shot created to introduce the characters. It needs a bit more work doing to it before it can be put into the final film, for example the rat needs to face the camera so the audience can see his face rather than just his nose. The music and narration needs to be added too.
Friday, 16 March 2012
Compositing and first shot
I was trying to find out the best way to composite the shots together. The problem that I found was that the river was created using the ocean shader that renders in mental ray, the rest of the environment needs to render in VRay to get the black outline when rendered.
To solve this issue, I tried to use render layers but that would not render the river in the correct shape, it would render the river in mental ray and the rest in VRay but it would render the square of ocean rather than the shape of the river which meant for any shot, I would have to go through and delete or mask the edges of the river so it only appeared in the black lines outlining the river shape.
The test that I was trying was to colour everything in the scene a bright lime green, just leaving the river the normal colour. Then in After Effects, I could key out the bright green colour just leaving the river. I can then render the same scene again with the correct colours in VRay and lay the river over it so it matches up perfectly.
I used out first shot as an opportunity to test this. Our first shot is an establishing shot of the environment. It has a slow zoom from a wide shot of the scene to the finish line which is the pavilion.
The environment didn't move so I cheated a little bit and rather then render a scene where nothing changes, I used a still image of our scene.

When I rendered this image, I had bookmarked the camera angle so I knew exactly where the camera was to match the animation of the river to this angle.
I then rendered out the river animation with everything else in the scene bright green. Mental ray did not render out the trees as they had VRay Toon attached to them so they would only render in VRay.
I keyed out the green in After Effects but it still left some noise around the river. The only way I could get rid of this was to create a layer mask in After Effects as close to the river as possible to get rid of most of the noise.
I layered this over the image but noticed that the trees were behind the river as they were part of the background. I rendered out a shot with everything else in the scene deleted apart from the trees so the trees would be on a layer by themselves. This was layered on top of the river. This was how the composited shot looked.
I then added the zoom towards the pavilion and this was our first shot.
The subtitles are to be added later when all the shots are finished and we are assembling the final sequence. The music and narration will be added at this point too.
Subscribe to:
Comments (Atom)