I have learnt more than going through this project than any other. I have had a lot of problems with the group project and then in the end, decided it would be better to focus on my own work than try to piece together something that I would not be happy with.
Part of that learning curve was to always have a contingency plan as if things do not work out, like I found, they are there to fall back on. I also leant not to be afraid to call people up on not pulling their weight within the group. At times it felt like I had to nag people to do things for me and I wasn't even the director. I think another part of the problem with our original film was that none of us wanted to quit. In hindsight we should have probably cut the film a long time ago to concentrate on a personal work because it was clear just after christmas that it was a slowly sinking ship. I think persevering was the right thing to do but I think we all persevered for a little too long and should have said that it was becoming too troublesome.
My skills at a technical level have improved the most. This year I was able to learn MEL scripting as well as try other things like nCloth, fur and RealFlow. This is what I have enjoyed the most - learning and developing. Most of the group project was troubleshooting with all the issues we ran into. At times it felt as though we were going two steps forward and one step back because as soon as something went well, we would face another problem. It helped me get a better understanding of Maya and ho to troubleshoot though. I was mainly supporting the team when they found issues and i would be the "go to" person to fix it. I have also learnt that I am not a very good animator and it is probably my weakest area. I can move a camera around okay but animating Melvin the cat and making it look good was probably one of my biggest personal achievements this year.
My other personal achievements were learning to use RealFlow (even though it was only the basics I still learnt it) and MEL scripting. I was surprised at how much satisfaction I got from creating a whole script for set driven keys without any reference or guide and from just using Maya.
Before this year I wasn't really sure what my specialism was. I had skills in most areas like modelling, rigging and animation but this year has given me a clear direction into where I want to be in the future and that is in the technical area of animation and visual effects. I will still keep those skills I had previously but I think I thrive with a challenge and I find the technical stuff more challenging.
I will continue to develop my skills going forward and also my showreel and even though this year has been extremely stressful, I glad I went through it because I feel like I know where I am heading in the future.
Sunday, 27 May 2012
Friday, 25 May 2012
Showreel
I have been looking at some technical showreels online and I think that I need to really improve mine. My old one was a miss mash of my work done over a couple of years but since then I have found what direction I wanted to go in and need to make a showreel that reflects that.
My showreel will not be able to compete with some studio showreels like the CineSite technical showreel and Studio Liddell. My showreel will show my technical skills. I thought about putting some ocean shader and wake tests but then I thought that it doesn't really show skill because they are just settings. What I decided to do instead was show me playing around with my rig, my blend shapes working and MEL scripting. All these videos will be sped up so that it will fit into under two minutes (they were originally about 10 minutes). As something extra, I have put the rig working and animated at the end so people can see the rig in action.
My showreel can be improved upon as I do better work and develop my skills after I leave university but at the moment this is what I will use to try to make an impression for employers.
The hardest part was choosing suitable music. Some music had sour language in and then with one track, I tried to loop the introduction which was just under a minute but I couldn't loop it and make it sound good, it was obvious it was repeating. In the end I went for a Daft Punk track called "Aerodynamic"which is just an instrumental piece. I faded out the end so that it didn't just come to an abrupt stop and layered it over my showreel.
I wasn't happy with my title pages because I thought the writing was too big and distorted slightly so I created some different title pages an in the end went with a more professional looking black with white writing. I also forgot to credit the music track artist so I added that in small italics at the bottom.
I think my showreel does have a theme because I use the same model throughout the piece. It is kind of a story from rigging to animation. It starts with me testing the rig on the cat and then viewing the blend shapes and leads to MEL scripting and ending with an animation test of the rig in action. There was a lot of other things I could have put into my showreel, like my nCloth tests, but I like the way it flows.
I have uploaded this to vimeo and youtube and below is the finished showreel.
Putting into folders
I have been trying to organise my things into my folders. This has taken me quite a lot of time because I have a lot of tests and images/screenshots that I have had to go through to pick out what is going to be in my videos for each folder and what I am going to put as images.
I had to organise and rename a lot of screenshots so I knew what they were so they were easy to identify when trying to organise them.
When I had organised them, I had to put them into After Effects and make them into videos. I was surprised how I felt the order of the video was important so most of my better work was either in the middle or at the end.
I think that if I had more time, I would focus on some more animation as that is my weakest folder. I am not entirely happy with my work because when it has been put into folders, it does not seem like a years work so I think it could have done with some more development and variation in some areas. It is too late to really develop anything else and start new projects but I am happy with the work that I have done.
Tuesday, 22 May 2012
Fur
I have been doing some tests to be able to add fur to the Melvin cat rig.
I had never used fur before so used my "Mastering Autodesk Maya 2011" to read up about it. In the book it gives you an example of a dog and explains how to add fur and paint the different attributes. This was a good starting point for me so I could then develop further.
I firstly did a basic test to see how the outcome would look if I used a preset built into Maya. I used the Calico Cat preset but changed the base colour and tip colour to the same texture file that Sarah Strickland had created for the skin of the cat. Below was the outcome.

This was not the outcome I was quite expecting but then I started to adjust some of the settings such as polar and inclination to get the fur going it the expected direction. The main way to control the fur was to keep playing around with the settings. I had to make the fur density more and the fur opacity higher and eventually I got something that resembled the cat fur I was looking for.

It still needed a lot of work so I continued to play with the settings so that the fur wasn't so straight and was more fuzzy. I wanted it slightly shorter as well rougher. The thing that really stood out though in every test I did was there were some bald patches that would not disappear. I tried increasing the density but the fur did not appear in the bald patches.
After some research online about this problem I started to look at baldness maps. I didn't want the fur on the inside of the ears and I could paint it so there was fur where there currently wasn't. The white mesh would be areas where there is fur and the darker the area, the less fur there would be. I tried to use the paint attributes tool to literally paint on the bald areas but it didn't work. There are some black spots in the image below that would not be painted white no matter what I did.

This lead me to create a custom baldness map. I started with the texture map and took it into photoshop to make it greyscale. There were some areas on the legs where I wanted fur but the area on the map was dark so I had to make some adjustments. When I added this map to the model, below is an image of how it turned out.

There are still some areas (like the bottom of the left leg) where it is still bald for no apparent reason. With that aside, with the baldness map, I was not very happy with the outcome. Some of the areas which are completely bald do not look natural. On the face for example, as the baldness becomes less, it looks strange because you see random strands of fur when the fur should gradually get longer instead.
To change this, rather than attaching a baldness map, I applied a map to the length. This meant all the darker areas would have shorter hair and the lighter areas would have longer hair. It was a lot easier to create because all I did was greyscale the texture map and adjust the contrast and brightness levels. This was the final map:

I had to continuously keep testing the brightness of the map to get the correct length for the fur. Once I was happy I attached it to the model and this was the outcome:

It needed some more tweaks but it was heading in the right direction and looking more like natural fur.
After experimenting more with the settings, I managed to achieve a balance of most of the attributes. The final fur image is below.

There are still some baldness issues on the front leg but I cannot find a way to get rid of it. I have researched on the internet and even posted on some forums but no one seems to know why it could be happening. I had to admit defeat on this problem as I don't think I will be able to resolve the issue anytime soon. Instead I decided to turn my attention to scripting again.
I found a fur script online for a bear and decided to take a look at it. The script is basically a list of all the fur attributes and their values. It was surprisingly simple to me how easy it would be to replicate the fur I created above in a script. The only issue I would have is the base and tip colour attributes because I am using a texture file. If it was a plain colour with set colour values it would be a lot easier but I am not sure how I would be able to add a texture file to the script for others to download. If it was only for myself then I would add a file path into the tip and base colour attributes section.
This is something I will look to develop in the future as to write a script as large as is required to make it work instantly for my model would take a lot of time which I am currently short of. It would definitely something to help me with my scripting skills in the future.
Thursday, 17 May 2012
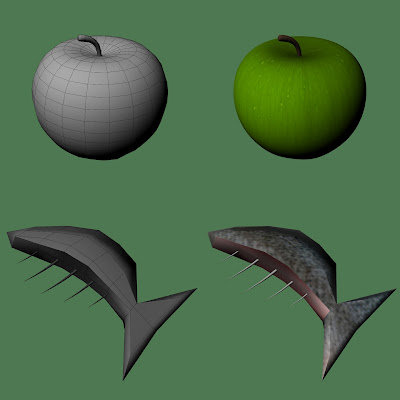
Wireframe Rendering
For my artist folder, I have done a lot of modelling. I wanted to show the polys on my models so I was looking for a way to render so it shows the wireframe.
I found a way to use mental ray so it would render out the wireframe of my models by looking at a couple of forums and also looking at a book called "Mastering Autodesk Maya" by Eric Teller which tells you about rendering settings. From these sources, I pieced together a good method of allowing the wireframe to be rendered.
The first step was to create a new material and then go to the shading groups and find that material. Then select it and go to the attribute editor. Under the shading group material there is a mental ray section. It then allows you to select contour shading on. I adjusted the settings so that the colour of the contours were black and that were not completely visible (the alpha channel to 0.750) then the thickness to just 0.5. In the attributes of the material, I made the colour a slightly lighter grey.
In the render settings, when mental ray is chosen as the renderer, there is a features tab. In there is contour rendering options. I made sure it is ticked on there and then under "Draw by property difference" I ticked on "around all poly faces".
When the new material is applied to the objects it renders out like in the image below. The left images are when the contour rendering has been applied and the right images are the models with the original materials applied.

I have used contour rendering with all my models and for most of them, have used with a turntable animation so the wireframe can be seen at all angles.
Tuesday, 15 May 2012
Melvin Interacting
I wanted to create an animation showing Melvin the cat interacting with things in the scene.
I thought about doing a cat interacting with a box but after playing around with the rig, it would be very hard to achieve without breaking some parts of the rig. In the end I decided to create a cat nuzzling past the box.
I used my parents cat for reference again this time because she always nuzzles against most surfaces. The main thing that I noticed was that when they nuzzle against things, their whole body goes against the thing they are nuzzling. I tired to get this across.
I put in the key poses first to try and get a main idea about how the cat would interact. Below are a couple of key poses to get an idea of how the cat will act


I tried to pick the best angle to show the body against the box and the face nuzzling. This was then rendered out.
I thought about doing a cat interacting with a box but after playing around with the rig, it would be very hard to achieve without breaking some parts of the rig. In the end I decided to create a cat nuzzling past the box.
I used my parents cat for reference again this time because she always nuzzles against most surfaces. The main thing that I noticed was that when they nuzzle against things, their whole body goes against the thing they are nuzzling. I tired to get this across.
I put in the key poses first to try and get a main idea about how the cat would interact. Below are a couple of key poses to get an idea of how the cat will act

I wanted to have the whole body leaning up against the box even when the cat was walking along.

This is the cat face nuzzling against the box. The cat is pushing its whole front of the body into pushing the face against the box.
There was mainly walking in this shot but because the box was in the way, the walk had to adjust to a change of path. It also had to have its weight shifted against the box.
The main troubles I had with this were animating the tail because the controls are not very good to get a flick. If I were to do the rig again I would not use the spline IK handle tool, even though most books and riggers recommend it for tails and spines etc, in this case i needed more control over the tail which this IK did not give me and became very frustrating. The other issue I had was sipping in the feet. As the cat was walking I kept having to adjust the feet so they would not slip. Whenever I adjusted the feet at one point or moved the body to get rid of the slipping, it would effect it somewhere else. I mainly used the graph editor to rectify the issue but no matter how hard I tried, there was still some slipping. I tried to make it as unnoticeable as possible.
Here are the play blasts of my interaction animation.
I tried to pick the best angle to show the body against the box and the face nuzzling. This was then rendered out.
Friday, 11 May 2012
Cat jump
I have doing some more tests with Melvin the cat. I decided to try to animate him jumping onto a plinth. The reason I am doing this is because this nation has a lot of anticipation and secondary action with the tail. I thought it would be good to try and stretch my animation skills.
Firstly, I had to try and find some reference footage. I do not live with a cat and the cats that live around me tend to hind so my best source was YouTube. I found a good video with a cat called Maru jumping into a large box. It did not show me how cats would land on a plinth but it gave me good reference for how a cat would prepare to jump. Below is the video from YouTube.
For the landing, I used my parents cat and watched her as she climbed onto my parents windowsill. I didn't manage to catch it on video but she always is going up onto the windowsill so I managed to catch her quite a few times.
From this I was able to animate a jump scene. The only problems I had were to do with the shoulders, back legs and the tail, when they are pushed forward too far then they start to protrude out from the chest. When doing a jump though, there are parts when the cats shoulders are extremely forward especially mid jump when both pairs of legs are stretched out. The back legs had to be scrunched up when climbing onto the plinth and at some points, for a very short amount of time, the legs go inside the thigh. The hardest thing was the tail. The controls do not allow the tail to flick very easily so there were some parts where I wanted the tail to flick, but I couldn't get it to.
When I was finished, it was hard to see everything from one angle so I took some play blasts from different angles and then only rendered from one angle. This was because there are subtle movements like the bottom when the cat s about to jump. These may be missed if it is only seen from one angle.
Subscribe to:
Comments (Atom)